ADS
From CVL Wiki
Contents |
Getting Started
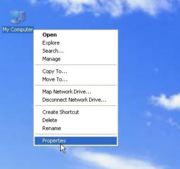
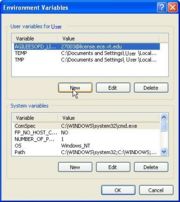
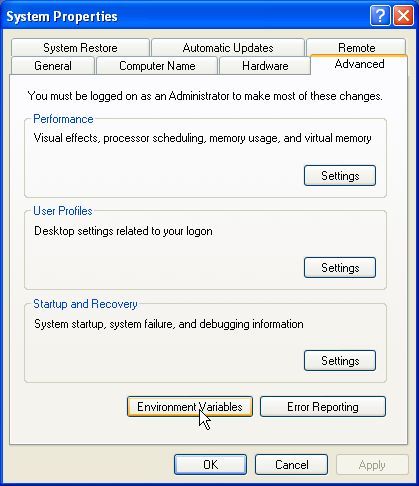
Before installing ADS you need to do this important step in order for the program to work. On the desktop right click on my computer and select the properties option from that menu (fg.1). A window called System Properties should pop up. From here select the Advanced Tab (fg.2). Under the Advanced tab click on the button called Environmental Variables. Select New for the options for User variables (fg.3). Enter for Variable name AGILEESOFD_LICENSE_FILE and for Variable value 27003@license.ece.vt.edu (fg.4).
Once the new environment variable has been entered you can proceed with the installation of ADS below.
Installing ADS on Windows (2000/XP/Vista)
Disclaimer: ADS is to only be installed on a University Owned Computer.
Install
Step 1 Double click on My Computer and in the address space type \\filebox.ece.vt.edu\ADS. Note that the slashes are back slashes, "\", not "/". If this does not work, try \\128.173.88.43\ADS. To gain access to the folder you must type in your ECE Username and password.
Step 2 Once in the ADS folder find the file called setup.exe and double click to start the installation.
Step 3 Click next on the first window that welcomes you to the installation. The Next page is the license agreement (please familiarize yourself with the license) which you accept by clicking the yes tab.
Step 4 Enter your desired user name and Virginia Tech ECE as the Company Name. The next window you will define where ADS will be installed (C:\ADS2006A\ is the default). After defining the install folder you will specify your home directory where all your projects will be saved to. (default is C:\users\default)
Step 5 In the next window click complete install. After you have done this the program will confirm the options you have chosen. Review these and continue. The program will install itself now.
Step 6 After the install completes a window will pop up telling you that you need a license to run the program. Just click OK. Another window will pop up asking if you will be using a FLEXid Dongle, click no.
Step 7 ADS will ask you to restart your computer in order to complete installation.
For a visual representation of the steps just covered please click here.
Additional Links
Momentum Tutorial
Agilent Home Page
Agilent history
ADS Tutorial
Return to Main Page
Return to Software Packages and Programs


