Xming
From CVL Wiki
(→Installing and using Xming to access the CVL) |
|||
| (7 intermediate revisions by 2 users not shown) | |||
| Line 1: | Line 1: | ||
| + | =No Longer Recommended= | ||
| + | We no longer recommend using Xming and Putty, instead we recommend [[MobaXterm]] | ||
| + | |||
==General Information== | ==General Information== | ||
Xming is an X Window Server for Microsoft Windows (XP/2003/Vista/7). This program allows remote access to the programs that are installed on the CVL cluster in Whittemore Hall at Virginia Tech. | Xming is an X Window Server for Microsoft Windows (XP/2003/Vista/7). This program allows remote access to the programs that are installed on the CVL cluster in Whittemore Hall at Virginia Tech. | ||
| Line 7: | Line 10: | ||
[[Image:xming-fonts_install.jpg|thumb|(fig.3) Xming-fonts install options.]] | [[Image:xming-fonts_install.jpg|thumb|(fig.3) Xming-fonts install options.]] | ||
[[Image:xming_taskbar.jpg|thumb|(fig.4) Xming taskbar icon.]] | [[Image:xming_taskbar.jpg|thumb|(fig.4) Xming taskbar icon.]] | ||
| − | ===Install=== | + | ====Install Xming==== |
| − | '''Step 1''' - Download Xming-6-9-0-31-setup.exe AND Xming-fonts-7-5-0-11-setup.exe from the following site [http://sourceforge.net/projects/xming/files/], | + | '''Step 1''' - Download ''Xming-6-9-0-31-setup.exe'' AND ''Xming-fonts-7-5-0-11-setup.exe'' from the following site [http://sourceforge.net/projects/xming/files/ Xming], under the Xming and Xming-fonts section. Note, version numbers may be different (See fig.1) |
| − | <br>'''Step 2''' - Double click Xming-6-9-0-31-setup.exe, read the first page of the setup and click Next. | + | <br>'''Step 2''' - Double click ''Xming-6-9-0-31-setup.exe'', read the first page of the setup and click Next. |
<br>'''Step 3''' - Select Destination Location -> Keep default option and click Next. | <br>'''Step 3''' - Select Destination Location -> Keep default option and click Next. | ||
<br>'''Step 4''' - Select Components -> Keep default option (Full install) and click Next. (See fig.2) | <br>'''Step 4''' - Select Components -> Keep default option (Full install) and click Next. (See fig.2) | ||
| Line 15: | Line 18: | ||
<br>'''Step 6''' - Select Additional Tasks -> Check 'Create a desktop icon for Xming' and click Next. | <br>'''Step 6''' - Select Additional Tasks -> Check 'Create a desktop icon for Xming' and click Next. | ||
<br>'''Step 7''' - Ready to Install -> Click Next. | <br>'''Step 7''' - Ready to Install -> Click Next. | ||
| + | |||
<br>'''Step 8''' - Completing Xming Setup Wizard -> Uncheck 'Launch Xming' and click Finish. | <br>'''Step 8''' - Completing Xming Setup Wizard -> Uncheck 'Launch Xming' and click Finish. | ||
<br>'''IMPORTANT''' - If Xming is running (there will be a black X in the task bar (fig.4), you must close this before running the Xming-fonts installation. | <br>'''IMPORTANT''' - If Xming is running (there will be a black X in the task bar (fig.4), you must close this before running the Xming-fonts installation. | ||
| − | + | ====Install Xming-fonts==== | |
| − | + | '''Step 9''' - Double click ''Xming-fonts-7-5-0-11-setup.exe'', read the first page of the setup and click Next. | |
<br>'''Step 10''' - Select Destination Location -> Keep default option and click Next. | <br>'''Step 10''' - Select Destination Location -> Keep default option and click Next. | ||
<br>'''Step 11''' - Select Components -> Check all check boxes to install all fonts and click Next. (See fig.3) | <br>'''Step 11''' - Select Components -> Check all check boxes to install all fonts and click Next. (See fig.3) | ||
| Line 25: | Line 29: | ||
==Using Putty to access CVL== | ==Using Putty to access CVL== | ||
| − | |||
| − | <br>'''Step 1''' Launch Xming either from the desktop icon, or from the start menu. No screens will come up, but you should see a black X icon in your taskbar. This indicates the Xmin X Windows server is running. (See fig.4) | + | *Click the [[PuTTY]] link to launch the SSH terminal and to remotely access the CVL programs. Setup instructions for Putty are [http://computing.ece.vt.edu/wiki/PuTTY here]. |
| − | <br>'''Step 2''' Open PuTTY and | + | |
| − | <br>'''Step | + | After following the PuTTY instructions: |
| + | <br>'''Step 1''' - Launch Xming either from the desktop icon, or from the start menu. No screens will come up, but you should see a black X icon in your taskbar. This indicates the Xmin X Windows server is running. (See fig.4) | ||
| + | <br>'''Step 2''' - Open PuTTY.exe and in the left section, go to Connection -> SSH -> X11 and check ''Enable X11 Forwarding'' | ||
| + | <br>'''Step 3''' - Go back to the Session section and enter '''''cvl.ece.vt.edu''''' into the Hostname dialog box. To log into the CVL use the account name and password that you created on the CVL's account creation page. | ||
| + | <br>'''Step 4''' - Once you have logged in you should be able to use the PuTTY terminal as if you were working at the lab. (for example type matlab to start matlab) | ||
Latest revision as of 13:23, 19 September 2014
Contents |
[edit] No Longer Recommended
We no longer recommend using Xming and Putty, instead we recommend MobaXterm
[edit] General Information
Xming is an X Window Server for Microsoft Windows (XP/2003/Vista/7). This program allows remote access to the programs that are installed on the CVL cluster in Whittemore Hall at Virginia Tech.
[edit] Installing and using Xming to access the CVL
[edit] Install Xming
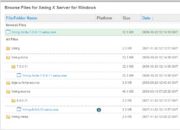
Step 1 - Download Xming-6-9-0-31-setup.exe AND Xming-fonts-7-5-0-11-setup.exe from the following site Xming, under the Xming and Xming-fonts section. Note, version numbers may be different (See fig.1)
Step 2 - Double click Xming-6-9-0-31-setup.exe, read the first page of the setup and click Next.
Step 3 - Select Destination Location -> Keep default option and click Next.
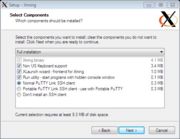
Step 4 - Select Components -> Keep default option (Full install) and click Next. (See fig.2)
Step 5 - Select Start Menu Folder -> Keep default option and click Next.
Step 6 - Select Additional Tasks -> Check 'Create a desktop icon for Xming' and click Next.
Step 7 - Ready to Install -> Click Next.
Step 8 - Completing Xming Setup Wizard -> Uncheck 'Launch Xming' and click Finish.
IMPORTANT - If Xming is running (there will be a black X in the task bar (fig.4), you must close this before running the Xming-fonts installation.
[edit] Install Xming-fonts
Step 9 - Double click Xming-fonts-7-5-0-11-setup.exe, read the first page of the setup and click Next.
Step 10 - Select Destination Location -> Keep default option and click Next.
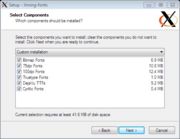
Step 11 - Select Components -> Check all check boxes to install all fonts and click Next. (See fig.3)
Step 12 - Select Start Menu Folder -> Keep default option and click Next.
Step 13 - Completing Xming-fonts Setup Wizard -> Click Finish.
[edit] Using Putty to access CVL
- Click the PuTTY link to launch the SSH terminal and to remotely access the CVL programs. Setup instructions for Putty are here.
After following the PuTTY instructions:
Step 1 - Launch Xming either from the desktop icon, or from the start menu. No screens will come up, but you should see a black X icon in your taskbar. This indicates the Xmin X Windows server is running. (See fig.4)
Step 2 - Open PuTTY.exe and in the left section, go to Connection -> SSH -> X11 and check Enable X11 Forwarding
Step 3 - Go back to the Session section and enter cvl.ece.vt.edu into the Hostname dialog box. To log into the CVL use the account name and password that you created on the CVL's account creation page.
Step 4 - Once you have logged in you should be able to use the PuTTY terminal as if you were working at the lab. (for example type matlab to start matlab)


